1. Installation
Downloading from ThemeForest
Download the Exhibit theme from your ThemeForest downloads page and then unzip the download. Once the download has been unzipped you should see a folder called exhibit-theme.
Uploading The Theme
Before uploading the theme make sure you have installed WordPress 3.0 or higher. You can download WordPress for free from WordPress.org. Now you can upload the theme in one of two ways:
1. Upload via WordPress
- From your WordPress dashboard go to Appearance -> Themes.
- On the Themes page click the Install Themes tab.
- Click the Upload link directly below the two tabs which takes you to a page to upload the theme.
- Click the Browse button and locate exhibit.zip that is inside your exhibit-theme folder. Double click the file to select it and then click the Install Now button.
If you have trouble uploading the theme via WordPress you will need to upload the theme via FTP as explained below.
2. Upload via FTP
- You need to use an FTP client such as FileZilla. To set up your FTP client to connect to your website see: http://codex.wordpress.org/Using_FileZilla
- Upload the exhibit folder that is inside your exhibit-theme folder to your WordPress themes directory wp-content/themes/.
Activating The Theme
When uploading the theme via WordPress you should be prompted to activate the theme. If uploading the theme via FTP go to
Appearance -> Themes and click the
Activate link below the Exhibit theme.
Theme Options
Once you have activated the theme you will see a new option under the
Appearance tab called
Theme Options. Click this link to go to the theme options page and click the
Save Changes button to save the default theme settings.
2. Demo Content
A demo package comes with the theme that includes example posts, pages, comments, custom fields, categories, and tags etc. which can help you in learning how the theme works. To add this content follow the steps below:
- Go to Tools -> Import and select the WordPress option. If you are prompted to install the WordPress Importer plugin you should do this.
- Click the Browse button and locate the demo.xml file that is inside the exhibit-theme/help folder and double click the file to select it and then click the Upload file and import button.
- A new screen will appear, check the Download and import file attachments option and click Submit.
3. Updating The Theme
From time to time free theme updates will be released which will include bug fixes and feature updates. When a theme update becomes available you should see a New Updates message in your admin panel. To get these themes updates you will need to re-download the theme from your ThemeForest downloads page and unzip the download file.
- Before updating you should make a back up of your the current theme just in case something goes wrong in the updating process.
- To do this, using an FTP client download your exhibit theme folder from the wp-content/themes/ directory to your hard drive and then rename the folder to something like exhibit-old.
- Now upload the new exhibit folder that is inside your exhibit-theme folder to your WordPress themes directory wp-content/themes/ overwriting the current exhibit theme folder.
- Go to Appearance -> Themes and check the new version number.
- Your content, settings, images as well as CSS customizations from Appearance -> Theme Options -> CSS Settings will not be lost when you upgrade the theme.
If you have made changes to the theme files you will want to either make the changes again to the new theme files or just upload the updated theme files if they are not your modified files. Visit the
changelog, which tells you which files have been updated, added and removed. You can then download
DeltaWalker or
DiffMerge and compare and add the code changes between your modified files and the new theme files.
4. Setting Up The Theme
Homepage
- Go to Settings -> Reading and make sure the Your latest posts option is selected.
- Now go to Appearance -> Theme Options -> Homepage Settings.
- From the Category Type drop down menu choose whether to display posts from an ordinary post category OR from a portfolio category. Now you can select a specific category from EITHER the Portfolio Category OR Post Category drop down menu, or leave it set to All.
- You can also change several other settings from this page including the image dimensions, text display etc.
Post Categories
- To create a new post go to Posts -> Add New.
- Give your post a title and add some text in the main text box.
- On the right-hand you can assign your post to categories from the Categories panel.
- Scroll down to the Post Settings panel where you can control the way the individual posts looks.
- On the right-hand side you will see a Featured Image panel, click the Set featured image link to set an image for this post.
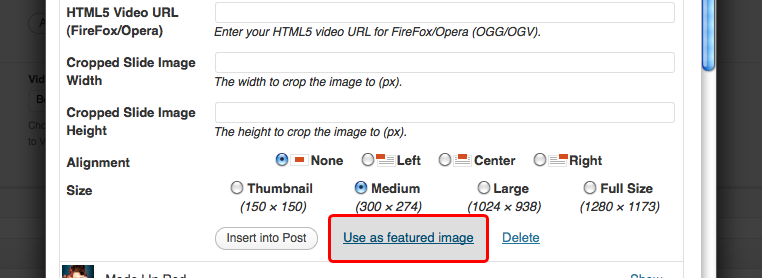
- After uploading or selecting your featured image click the Use as featured image link in the image upload window.
- To add a slider to your post scroll down to Settings for displaying a slider on the post... section and select the Enable Slider option (this will also disable the featured image from being displayed in your post).
- Click the Add Slide(s) button to open the image upload window.
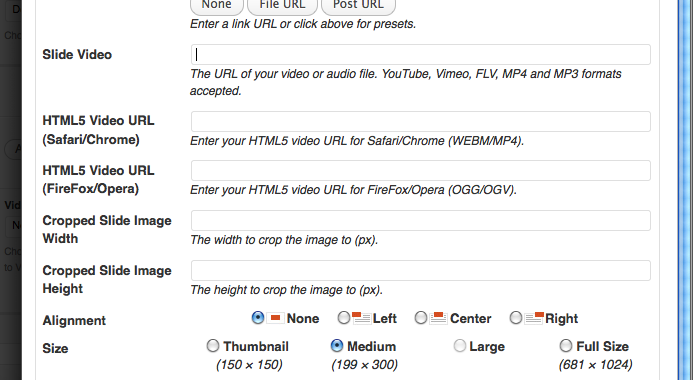
- Once you have uploaded your image(s) you can add a caption, video URL to the image and crop the dimensions in the slider. All other options will not be used in the slider.
- Now close the window without clicking the Insert into Post option.
- Go to Appearance -> Post Category Settings to change the image dimensions, text display etc. of the posts on category pages.
Portfolio Categories
- To create a new portfolio item go to Portfolio Items -> Add New.
- Give your item a title and add some text in the main text box.
- On the right-hand you can assign your item to categories from the Portfolio Categories panel.
- Scroll down to the Portfolio Item Settings panel where you can control the way the item looks.
- On the right-hand side you will see a Featured Image panel, click the Set featured image link to set an image for this item.
- After uploading or selecting your featured image click the Use as featured image link in the image upload window.
- To add a slider to your post scroll down to Settings for displaying a slider on the post... section and select the Enable Slider option (this will also disable the featured image from being displayed in your post).
- Click the Add Slide(s) button to open the image upload window.
- Once you have uploaded your image(s) you can add a video URL to the image and crop the dimensions in the slider. All other options will not be used in the slider.
- Now close the window without clicking the Insert into Post option.
- Go to Appearance -> Theme Options -> Portfolio Category Settings to change the image dimensions, text display etc. of the item on category pages.
Navigation
- Go to Appearance -> Menus to set up your sidebar and footer navigation menus.
- Click the + button and create two menus.
- On the left-hand side from the Theme Locations panel select one of your menus from the Side Navigation drop down menu and one from the Footer Navigation drop down menu.
- When adding navigation links to your sidebar you can set up navigation headers by adding custom links with a # as the URL.
- Indent links that you want to display underneath that header.

- If you cannot see the portfolio categories on your navigation, click the Screen Options button in the top right corner of the page and check the Portfolio Categories option.

Shortcodes
This theme comes with several shortcodes. Shortcodes are pieces of code that can be inserted directly into your main text box on posts, pages and portfolio items to add certain content easily such as videos and dividers.
- Click the Visual tab at the top of the main text box on any post, page or portfolio item.
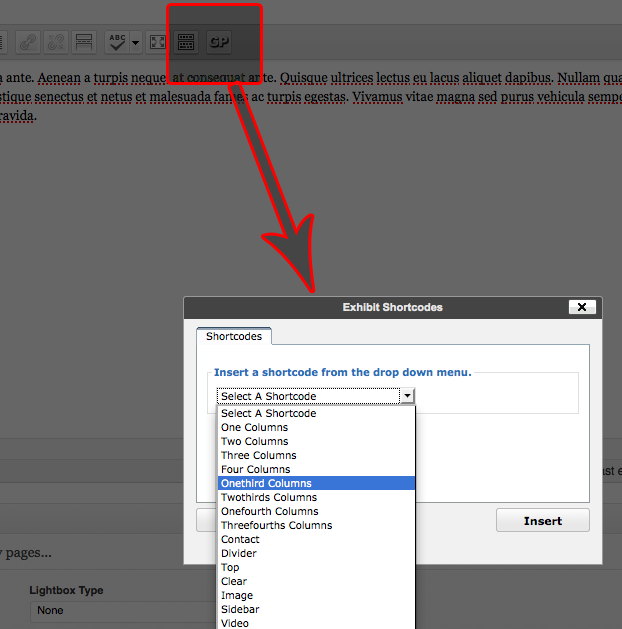
- Click the GP button to open the shortcode window.
- From the shortcode drop down menu select a shortcode, which will automatically be inserted into the main text box.
- You can view the full range of options for all the shortcodes from the following page.
Contact Page
- Go to Pages -> Add New to create a new page.
- Insert the contact form shortcode into the main text box e.g.
[contact email="youremail@address.com"].
- Replace
youremail@address.com with your own email address.
- If your contact form is not working click here.
Sidebars/Widgets
- Go to Appearance -> Sidebars, click the Add Sidebar link and give your new sidebar a name.
- Now go to any post, page or portfolio and scroll down to the settings panel.
- Now select one of your sidebars from the Sidebar drop down menu.
- Go to Appearance -> Widgets and drag and drop widgets from the Available Widgets panel over the to your sidebar widget panels on the right.
Translation
- Install the translation program Poedit.
- Open the exhibit-theme/exhibit/languages/en_EN.po file with Poedit.
- Translate the file with Poedit, click here for more information.
- Locate wp-config.php, which is in the root directory of your WordPress installation and change the language, click here for more information.
- If you want your website to support multiple language you can use the qTranslate plugin.
Using The Lightbox
- To use the image or video pop up effect add
rel="prettyPhoto" to your links as follows:
<a href="http://example.com/imagename.jpg" rel="prettyPhoto"><img src="http://example.com/imagename.jpg" alt="" /></a>

<a href="file=http://www.example.com/video.flv&image=http://www.example.com/image.jpg" rel="prettyPhoto[pp_gal]">Text Link</a>
- If you want to group images in the lightbox add
[pp_gal] to the link e.g. rel="prettyPhoto[pp_gal]".
- You can add the following files to the lightbox, using the following formats:
- YouTube: file=http://youtu.be/Sw-H3FoV2lc&image=http://www.example.com/image.jpg
- Vimeo: http://vimeo.com/8245346
- QuickTime: http://www.example.com/video.mov?width=780&height=418
- FLV/MP4/M4V/MP3: file=http://www.example.com/video.flv&image=http://www.example.com/image.jpg
- OGV/OGG/WEBM: http://www.example.com/video.ogv
- External Site: http://www.twitter.com?iframe=true&width=400&height=200
5. Troubleshooting & FAQs
If after installing the theme it says it is broken or the style sheet is missing see
http://wiki.envato.com/buying/support-buying/solving-broken-theme-issues.
This theme uses a script called TimThumb to resize and crop images. Here is a list of the most common problems encountered and their solutions:
- What path are you using for your images?
In most cases using the full path to your image should work. For example, you would input http://www.mydomain/wp-content/uploads/image.jpg (or whatever the path to your image is). However, some hosts do not allow the use of http://www. at the beginning of a URL. In this case you should use the relative path to your image, and remove your domain from the URL. In the above case, assuming your site is hosted in the in the root folder, the path to your image would just be: wp-content/uploads/image.jpg.
- Are the images hosted on your domain?
By default the script requires that all images need to be hosted on the same domain as your WordPress theme. To use images from another domain open the timthumb.php file in a text editor located at exhibit-theme/exhibit/lib/scripts/timthumb.php and add your domain after 'upload.wikimedia.org',.
- Does your cache folder have the correct permissions?
You need to give your cache folder located at exhibit-theme/exhibit/lib/scripts/cache/ full permissions. In most cases this is "777" but it may vary depending on where you are hosted (such as HostGator). If 777 does not work, try 755. It is recommended that you contact your host about what permissions to use if you are not sure. Settings permissions is also known as CHMODing, and can be done using most FTP programs and hosting control panels.
- Does your server have the GD library compiled with its version of PHP?
This script requires the GD library to be installed. If your images are not working, check with your host to make sure that you have it.
- Does your server have mod_security settings that are impeding the scripts functionality?
Some servers may have mod_security settings that will stop the script from working. You should always contact your host if you are having problems to make sure they do not have settings enabled that would stop the script from working.
This is a general WordPress issue. Go to
Settings -> Permalinks and resave the page to see if this fixes the issue. If not, adjust or delete your .htaccess file, which should be located where your WordPress files are stored. For more information on this please visit
http://codex.wordpress.org/Using_Permalinks.
You can convert posts to portfolio items by using the WordPress plugin
Convert Post Types.
My portfolio items are not being indexed by Google.
If this problem is happening with your site I suggest using the WordPress plugin
WordPress SEO by Yoast.
- You can load a RSS feed for reviews using one of the following URL formats:
- http://domain.com/feed/rss2/?post_type=portfolio_categories
- http://domain.com/?post_type=portfolio&feed=rss2
- For more information on WordPress RSS feeds see http://codex.wordpress.org/WordPress_Feeds.
- To combine your post and review feeds add the following to functions.php:
function myfeed_request($qv) {
if (isset($qv['feed']) && !isset($qv['post_type']))
	$qv['post_type'] = array('post', 'portfolio');
return $qv;
}
add_filter('request', 'myfeed_request');
You are probably receiving this error message because you are using a custom permalink structure without a forward slash at the end of your permalink. To fix this issue go to your
Settings -> Permalinks and in the
Custom Structure field add a trailing slash at the end of your permalink e.g.
/%category%/%postname%/. You may need to save this page twice for the settings to be correctly changed.
Go to
Pages -> Pages and edit the desired pages. In the top right corner of the page click the
Screen Options button and make sure the
Discussion box is checked. Now scroll down the page and locate the discussion panel and uncheck the
Allow comments box.
The are several reasons why you may not be receiving the emails:
- Your emails are being sent to your spam/junk mail folder
- You have entered the wrong email address in the contact form shortcode
- Your web host does not allow you to send emails from the same address your are receiving the emails to
- Your web host does not support PHPMail, you will need to contact them about this or switch hosts (I recommend DreamHosts)
- Your web host (in most cases GoDaddy) does not allow contact forms to send emails to certain email providers (e.g. yahoo.com, hotmail.com etc), you will need to contact them about this or switch hosts (I recommend DreamHosts)
You can convert posts to portfolio items by using the WordPress plugin
Convert Post Types.
WordPress uses Gravatar to add avatars (user images). Register a free account at
Gravatar.com, associate it with the email you're using on your WordPress site and upload your avatar image. Now go back to your site and within a short amount of time your avatar will show up in your comments, profile page etc. If you want people to upload an avatar from your own site instead, use a plugin such as
Add Local Avatar.